Did you know that there is a platform that allows you to view and manage your website in Google’s search engine?
Google Search Console (previously Google Webmaster Tools) is the first stop any SEO or marketer should take when launching their website online.
When you set up Google Search Console, you can see a treasure trove of marketing information you can use to optimize your website.
In this guide, we are going to show you how to use Google Search Console.
What is Google Search Console?
Google Search Console is a free platform provided by Google that allows you to view, manage, and optimize your Google presence.
With Google Search Console, you can see how Google views your website in its search index. For any marketer or webmaster, using Google Search Console should be a required step for a successful marketing campaign.
Why Set up Google Search Console?
Inside Google Search Console, you can see what keywords your website ranks for, how many people click to visit your website, what errors your website has, and other super important data that you need to know in order to rank well.
Not only that, but you can also do the following action items:
- Submit an XML sitemap
- View keyword rankings, CTR and Impressions
- Find website errors
- See slow loading pages
- Inspect URLs
- Remove URLs from Google’s Index
- View your websites mobile usability
- See any security issues with your website
So you can see there are a ton of reasons why you should set up and use Google Search Console.
Adding Your Website to Search Console
If you haven’t added your website property to Google Search Console, then you are missing out on a treasure trove of data that you can use to rank higher in Google, resulting in more leads, customers and sales.
Adding your website to Search Console is super simple. You will need access to the backend of your website (if its WordPress or other CMS) or the code if its custom developed.
First thing is to head to the Search Console page located here.
Click the big red ‘Add a Property’ button to begin the process of adding your site.

Enter your website URL and make sure you specify if you have https or not. If you do have https, you will need to add both versions and then set your preferred version.
Upon adding a website, you will need to verify that you own that website by:
- Google Analytics
- HTML Tag
- HTML file upload
- Domain Name Provider
- Google Tag Manager
Anyone of these methods will work to prove to Google that you own your website. View our Guide on verifying your website will Google Search Console to see how to do each method.
Once you have verified your website, you can now start managing your website on Google.
Adding Your XML Sitemap to Search Console
Now that you have verified your website, you can submit an XML sitemap to Google.
What is an XML Sitemap?
An XML sitemap is basically a list of all your website’s URLs and how important each one is to your website.
Here is an example of a small chunk of our XML sitemap:

When you submit a sitemap to Google, it can better crawl your website and pages so that all of your pages are indexed in Google and searchable.
Creating an XML Sitemap
Depending on what CMS (content management system) you are using for your website, creating a sitemap is usually pretty simple with an add on or plugin.
Most CMS’s have a sitemap functionality built-in but if you are on a custom-built website, you may need to create your XML sitemap manually.
There are tools like XML Sitemap Generator that can crawl your pages and make an XML sitemap for you. For CMS like WordPress, you can use a plugin like Yoast SEO to automatically generate an XML sitemap for you.
Submit Your Sitemap
Now that your XML sitemap file is generated, its time to add it to Google Search Console.
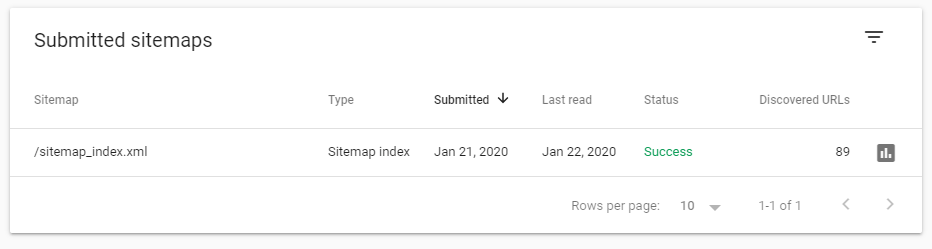
Login to the Search Console and click the ‘Sitemaps’ tab on the left menu.
On the sitemaps page, you will see a large box to add your sitemap URL. Remember to just add the relative path without your domain as that’s already provided.

Click the ‘Submit’ button and your sitemap should be added in the list below. It will almost instantly give you a status of the sitemap and the number of URLs included. Make sure the status says ‘Success’ or your sitemap may have not been submitted correctly.
That is all you need to do to set up your Google Search Console. Now, let’s take a look at what kind of awesome data you can find inside the Search Console.
Search Console Analytics
If you are much for all the data and you just want an overview of how your website is doing on Google, then the new Search Console is better for you. Its much more simplified and shows the data that you need to see like clicks, keywords and rankings.
The new console is still in development so they have added all of the options/tabs that you can access in the old Search Console.
Performance Tab
The new performance tab in Search Console gives you a much more simple look at your webmaster data. The top of the performance tab shows you your total clicks, total impressions, average CTR and average position with a really nice graph of the timeframe selected.
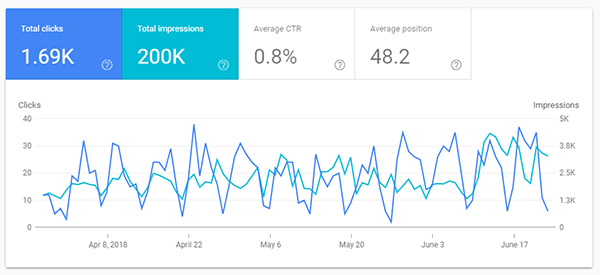
The date range can be changed to almost any timeframe and can give you a good look at spikes and drops in your traffic.
The bottom part of the performance tab will show you all of your keywords, pages, countries, devices and search appearance.
Just click from tab to tab to see each piece of data for the given timeframe.
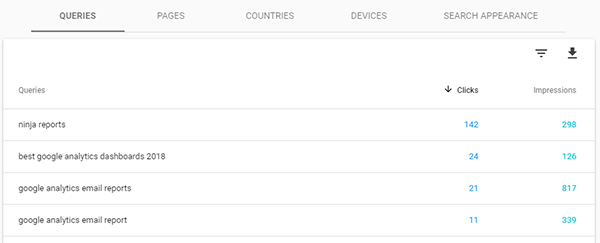
Click the down arrow icon in the top right corner to download the data to Google Sheets or Excel.
URL Inspection
With the URL inspection tab, you can have the Google crawlers crawl and inspect any URL from your website.
It will tell you if it’s included in the Google Index, if there are any Coverage, Mobile Usability or Sitelink searchbox issues.
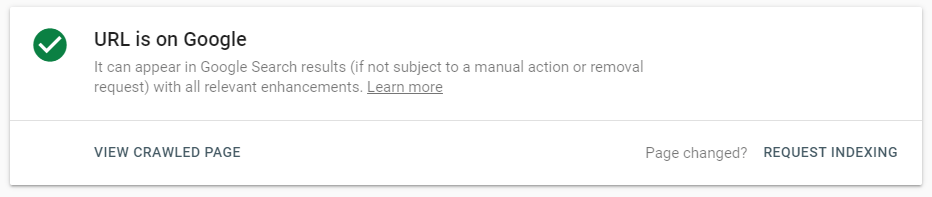
You can also request indexing of your URL to have Google crawl and index the page in Google.
Coverage Tab
The index coverage tab in Google Search Console will show you any errors that the Google Bot found on your website. This tab is important to keep an eye on as if you have errors on your website, you will not rank as well.
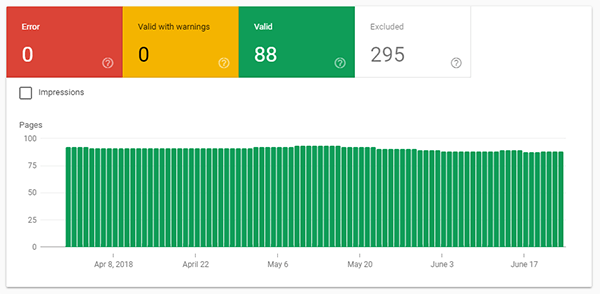
If you have 404s or any other issues like duplicate title tags or meta descriptions, then you will see them here.
Sitemaps Tab
As we went over before the sitemaps tab allows you to submit and manage your XML sitemaps so Google can index and find all of your URLs.
Removals
The removals tab is new as of 2020 and allows you to submit URLs of your website that you want to remove from Google’s Index.
According to Google you can, “Block URL(s) from Google Search results for about six months and clear current snippet and cached version (they’ll be regenerated after the next crawl). For permanent removal, either block pages from indexing or remove them from the site.”
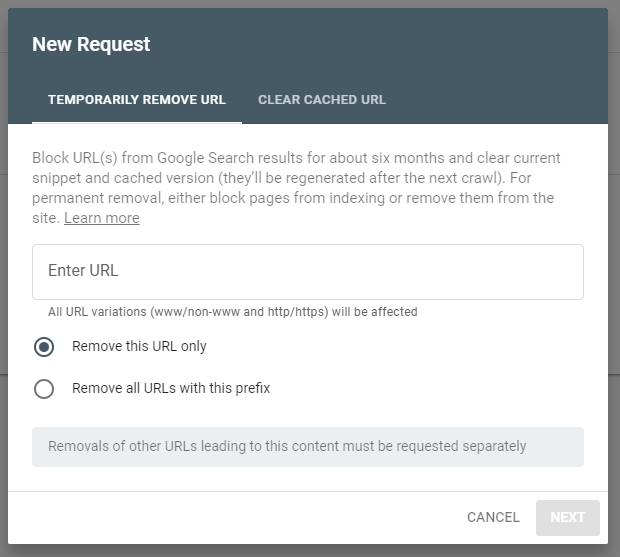
To remove a URL from the Google index simply enter the URL in the box and choose ‘Remove this URL only’.
This will temporarily remove the page from Google for about 6 months.
Speed
The new speed tab shows you any slow pages that are indexed in Google.
As you may know, having slow pages is bad for SEO and will decrease your website’s conversion rate.
Check the speed tab to make sure all of your pages are fast or moderately fast. If you find any slow pages, look at optimizing these pages so that they load faster and provide a better experience for your visitors.
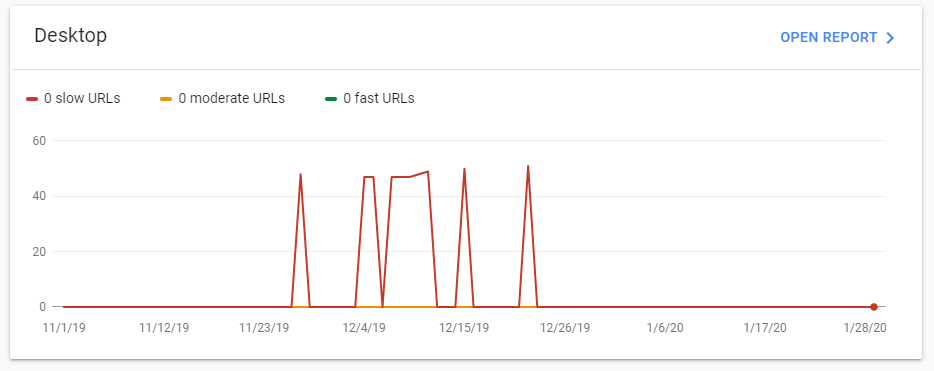
Click ‘Open Report’ to see exact URLs and reasons for slow loading times.
Mobile Usability
The mobile usability tab is pretty self-explanatory. It will show you any pages that are not mobile-friendly or not usable on a mobile phone.

As more and more people browse from their phones, having a mobile-friendly website becomes more and more necessary to rank well in Google.
Make sure there are no errors and that your website is fully usable on mobile devices.
Logos
the Logos tab allows you to view and manage the strucutred data on your website and if it is set up correctly.
Sitelinks searchbox
Like the logos tab, the sitelinks searchbox will show you any schema snippet errors that you have when using the Sitelinks Searchbox markup.

If you have search enabled on your website, you can add this schema snippet and let users search your site right from the Google SERP (search engine results page).
<script type="application/ld+json">
{
"@context": "https://schema.org",
"@type": "WebSite",
"url": "https://www.example.com/",
"potentialAction": {
"@type": "SearchAction",
"target": "https://query.example.com/search?q={search_term_string}",
"query-input": "required name=search_term_string"
}
}
</script>
Manual Actions
The manual actions tab will show you if your website has any manual actions against it that will require some action on your part.
This could be if your site is hacked, spam or is trying to trick users. Google will submit a manual action here will you will have to review it and submit that the issue is resolved.
Its important to keep an eye on this tab because if you have a manual action against your site, its very bad for SEO.
Security Issues
Lastly, the security issues tab will tell you if there are any security issues on your website.
Like the manual actions tab, you should occasionally check this tab to make sure your website is secure and doesn’t have any security issues.
Conclusion
In conclusion, Google Search Console should be step 1 when launching your website or starting a successful SEO campaign. You can do a number of things to manage your website in Google’s index.