Analytics is a key component of business success. We understand it, you understand it. But it’s a little harder to convince customers who are the end users of your company’s services. To make them believe in analytics, you need to provide them with the simplest, most informative, and easy-to-understand reports possible. Preferably, they should contain more graphs and fewer tables.
Such reports will be a vital element of the communication policy of agencies that provide advertising services on Facebook and other social networks. They must be perfect, so their creation should be entrusted to the best in class — top analytics platforms. These services automatically collect the necessary data, process it, and even organize newsletters.
Everyone wins: you save time and effort, clients receive the most transparent reports, and programs do all the hard work. Do you like this scenario? Then let’s choose the perfect Facebook Ads analytics service for your agency.
SE Ranking
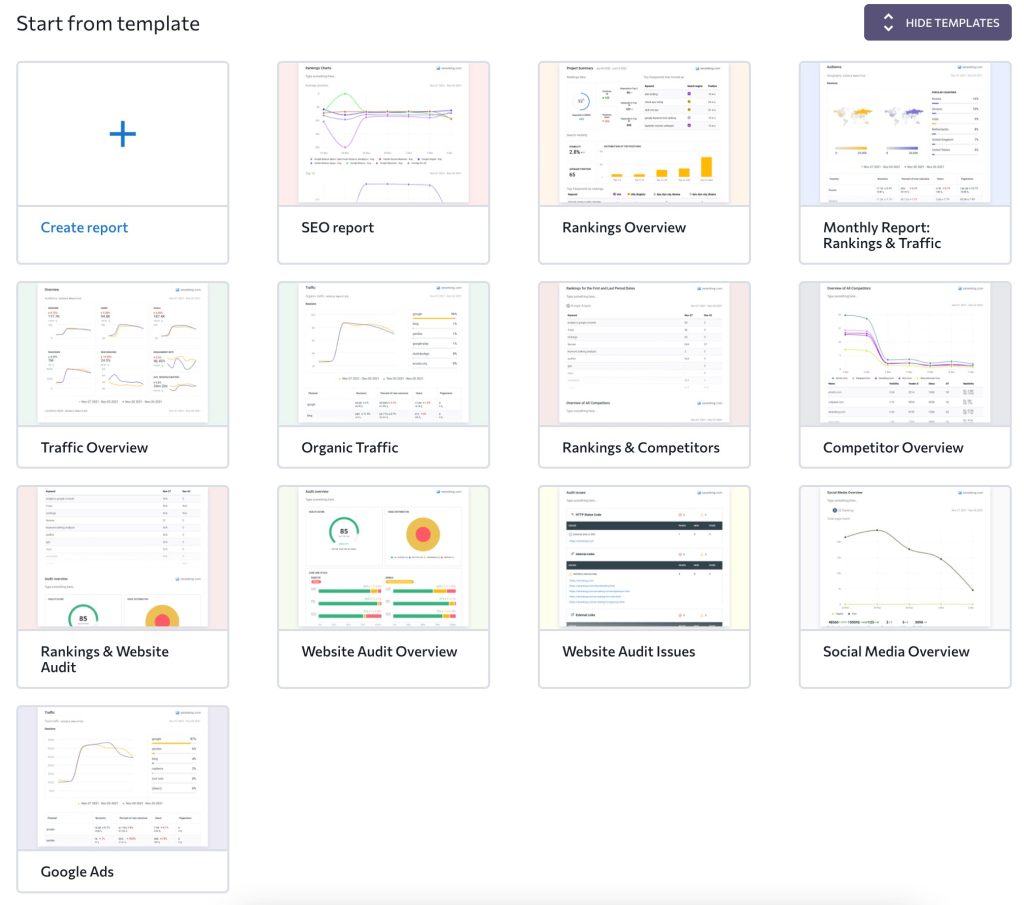
Accurate SEO reporting will show you as a professional, caring company, striving to team efficiency and customer satisfaction. With this in mind, SE Ranking created its SEO Report Generator Tool that will save you time and effort. Create your report with the drag-and-drop interface or choose among pre-defined templates for any need: social media and competitor overview, SEO performance, Google Ads activities, website audit summary, and more. You can also benefit from the white-label reporting and personalize it for your brand.
SE Ranking offers some of the most powerful Facebook Ads reporting tools in all possible areas. Do you build and share links on social media? The Backlink Monitor module will show you how many people have responded to your message on Facebook. Do you work in a highly competitive segment with no room for error? The Competitive Research feature will help you take the most successful elements of other companies’ marketing campaigns and avoid making the same mistakes.
The tool allows you to schedule and automatically send reports in just a couple of clicks. Convenient, multi-functional, and at an affordable price. Triple combo! Click on the button below and get a 14-day free trial to appreciate all its advantages.
Facebook Analytics
Facebook Analytics is a very powerful reporting tool for Facebook Ad agencies. The platform has come a long way and is great for getting deep into your client’s data. You can set up scheduled reports to send to your clients to keep them up-to-date with your ad campaigns.
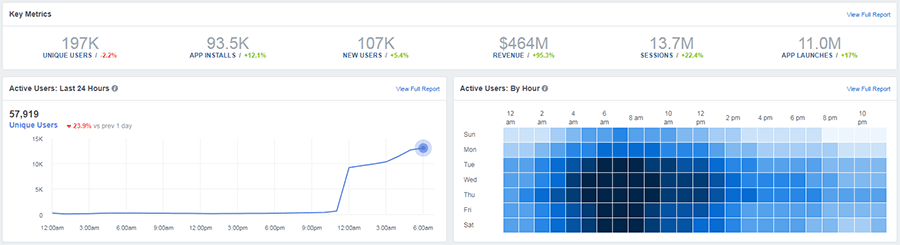
With Facebook Analytics, you can see several important KPIs, conversions, and demographics that will help you better optimize your clients Facebook Ad campaigns. Simply go to analytics.facebook.com and you can start seeing in-depth data about your client’s campaigns. You can even connect Facebook conversion revenue online so that you can see the revenue being generated from your Facebook Ads. This way, your clients can see exactly how much ROI your advertising campaign is bringing in.
Although this service lacks visualization tools, it remains one of the best Facebook Ads reporting tools. If you have experience with spreadsheets, you can easily customize them to your current needs by selecting the metrics and levels of granularity you need. For the latter, the platform allows you to view the performance of individual campaigns and even specific ad posts, which provides great insights for improving your marketing activities in the future.
Google Analytics
Being one of the most used website tracking software online, Google Analytics makes it super simple to send ROI-focused automatic reports to your Facebook Ad clients. If you do not have Google Analytics installed on your website or your client’s website, then you should install it now. With Google Analytics, you can track a plethora of really great data from your Facebook Ad campaigns. Simply add UTM tracking URLs to your Facebook Ads, and you can see detailed information about your Facebook Ads conversions, exit pages, CTRs, revenue, and more. Simply head to Google Analytics->Acquisiton->Social to see a number of reports that you can send your clients. You can even schedule automated Google Analytics email reports to send to your client’s email, daily, weekly or monthly. This can help free up some of your time so you can focus on what you do best… creating awesome Facebook Ads. Google Analytics is really simple to install. All you have to do is paste the javascript code block onto your client’s website and you can start tracking the performance of your campaigns.
Google Analytics is also among the best Facebook Ads reporting tools available to you for free. It provides huge amounts of information, allowing you to track traffic sources, monitor the behavior of website visitors, and build personalized sales funnels. Thanks to this, you can create perfect marketing campaigns for each segment of your target audience and each communication channel, significantly increasing your conversion rate.
Polymer Search
The main advantage of this Facebook Ads reporting software is the use of AI. Machine intelligence can organize your data sets, find patterns in them, segment them, and choose the best visualization schemes. You don’t need to be a mathematician or analyst to get informative reports with intuitive graphs — you just need to have basic database skills.
Polymer Search has built-in Facebook Ads reporting tools. These are dashboards that allow you to see the overall status of your business’s marketing activities, select the most successful campaigns, and segment your target audience. Clicking on each graph reveals details — down to the level of individual posts, the number of reactions under them, and the profitability of specific campaigns.
We’re used to paying hefty prices for advanced analytics. But Polymer Search is a pleasant exception to this rule. Subscription plans start at $25 per month, which makes the service affordable even for small businesses and small agencies. In addition, you have access to a 7-day trial period with no significant restrictions on functionality and no need to link a bank card to your account.
Metrics Watch
It is the top Facebook Ads reporting tool for those who want to focus on marketing work and not get distracted by technical details. Need to create a perfect report that is simple and informative? Use the built-in drag-n-drop visual builder. Drag and drop the metrics you need on the screen and choose the best graph layout in a few clicks. Is it time to set up your email campaign? Your customers don’t have to click on links or download attachments — all dashboards are embedded in the HTML code of emails.
Metrics Watch is not just a Facebook Ads reporting tool. You can upload data from 40 sources to the service, including your company’s financial results, customer base segmentation, marketing expenses, and much more. This allows you to track the impact of specific advertising campaigns on the business as a whole.
Metrics Watch is a fairly affordable solution. You can start with $29 per month, setting up regular distribution of two types of reports. White-label functionality is already included in the basic plan, so you don’t have to pay extra for branding your reports. This is quite a rare feature that most competitors don’t have.
Agency Analytics
If you’re looking for all-in-one Facebook advertising tools that can demonstrate marketing effectiveness across all possible channels, Agency Analytics is your perfect choice. The platform has analysis functions for:
- Organic traffic;
- Paid advertising in social media;
- Demographic and behavioral characteristics of subscribers;
- Profitability of marketing campaigns;
- Conversion at the level of individual posts.
What more could you ask for? Of course, white-label reports, are available here in one of the basic subscription plans. As for the subscription, the pricing model of the service is not as simple and transparent as that of competitors. You pay for individual campaigns of your clients, starting at $12 per month for each of them. This approach is more convenient for large businesses, which will find it easier to manage costs.
One of the advantages of Agency Analytics is a huge number of integrations. The platform serves as a kind of hub that combines data streams from 75 different sources. It also has a user-friendly mobile app that allows your clients to view reports on the go and discuss the performance of marketing campaigns at any time.
AdEspresso
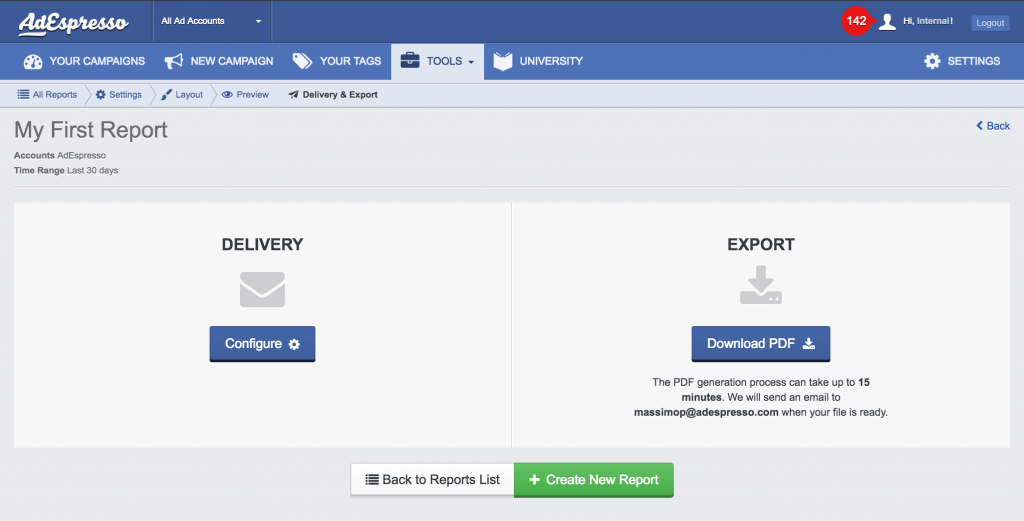
With AdEspresso, you can automatically optimize, track, and report your client’s Facebook Ad campaigns. This reporting tool is perfect for any FB ad agency looking to scale their business and manage a large number of campaigns right in the AdEspresso UI. They make it super simple to create ads, run A/B tests, send reports, optimize ads and stay on top of your client’s Facebook ad campaigns. You can start using AdEspresso for free with no credit card required and save a ton of time automating your Facebook Ads.
AdEspresso gives you an opportunity to look at the situation from both strategic and local levels. Each of the reports in this Facebook advertising tool can be granularized down to the level of individual ad posts, showing conversion rates, CTR, profitability, and even audience demographics. This allows you to compare individual solutions with each other and draw conclusions about their effectiveness, improving the quality of each subsequent campaign.
Not only is it a great tool for running ad campaigns, it’s also an amazing Facebook Ads reporting tool for agencies. You can automate your reports and send them whenever you would like and to whoever you would like. You can also use their advanced PDF Report creator that can help save hours by allowing you to create stunning PDF Reports for your clients with a simple drag-and-drop tool.
Simply Measured
Simply Measured is an all-in-one Social Media analytics tracking platform. You can do everything from discovering emerging topics and influencers to measuring conversions, leads and purchases from your social media campaigns. This Facebook Ads reporting tool provides a huge amount of information, far ahead of its competitors. You can monitor dozens of indicators – from the number of reactions and comments under specific posts to the level of subscriber engagement segmented by geographic and demographic factors. Social Media also allows you to generate reports on brand advocates, tracking the most active users and determining the tone of their comments.
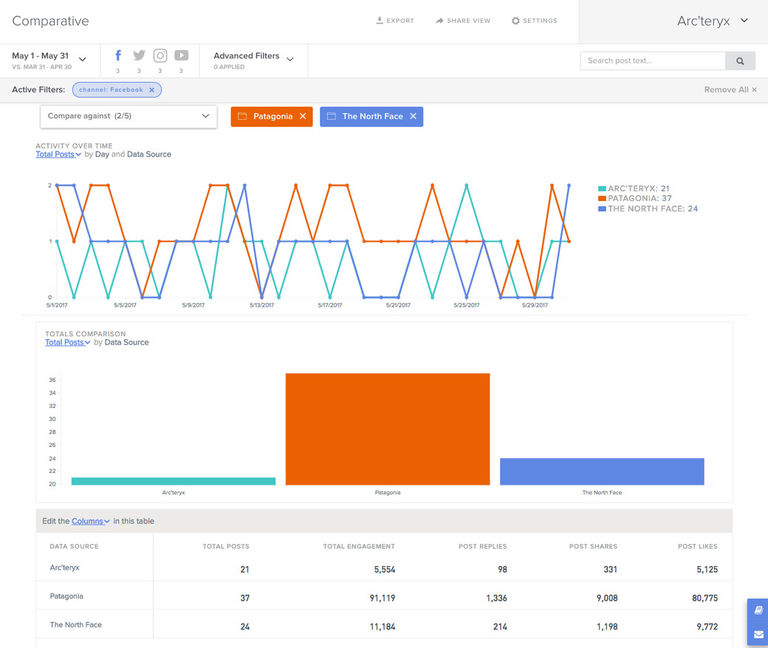
If your clients want to closely track their brand performance, benchmark against competitors, or optimize their Facebook content, then Simply Measured will fit right into your tools. You can see reports of the best-performing posts, when the best times to post are, and even see which posts are driving the most conversions to your client’s website. With Simply Measured, you can keep your clients up-to-date on their Facebook Ad campaign performance with real-time reports with a ton of KPIs that your client can log in and browse online from any device.
SocioGraph
SocioGraph is a cool tool for Facebook Ad agencies that allows you to see detailed analytics for Facebook Groups and Pages. View valuable data about your community like how many posts are shared, ratings, comments, etc. See the growth of your client’s pages or groups over time and get useful data about post engagement, and activity, and compare it to competitors. The user-friendly interface of Facebook Ads reporting software allows you to sort all your posts by popularity, number of positive reactions, reach, and other parameters. It’s a great solution for analyzing the quality of past posts and creating an ideal content plan for the future. The platform also allows you to set your own selection criteria, such as timeframes or the minimum number of reactions to a post. Get started with SocioGraph for Free or $19.99 a month for the premium version.
Quintly
The last reporting tool for Facebook Ad agencies is called Quintly. Its a professional social media analytics platform that allows you to track, benchmark, and optimize your social media performance across all channels. Quintly allows you to create automated reports to send to clients or bosses about your company’s or clients’ social media marketing performance. Quintly also has competitive benchmarking against competitors in your social media channels.
You can also connect your Facebook Insights so that you can compare your client’s pages and benchmark them against each other to see the best-performing content and ads. Quintly is the best Facebook Ads reporting tool in terms of visualization. The platform offers you many dashboard templates, each of which can be customized to the needs of the agency, choosing the best metrics, graph formats, and time frames. You can also download reports in PPT format to instantly turn them into presentations and hold productive meetings offline.
Wrapping Up
In conclusion, there are several great tools out there to automate your reporting for your Facebook Ad agency. If you have more than 5 Facebook Ad clients, then you should be thinking about how to save more time so you can focus on growing your agency. With these tools, you can increase your productivity by automating your reporting for clients. They will love you for it and you will have a lot more time on your hands.