Google Analytics email reports were created to provide an easy way to automate your reports and get detailed reports in your email daily, weekly, monthly, or quarterly. Many business owners and webmasters do not use the email reporting function of Google Analytics for many reasons including that they simply do not know how. Creating automated Google Analytics reports can save hours of time checking statistics by giving you pre-defined reports right to your email inbox whenever you need them… You can even add multiple recipients, attachment types, and a custom subject like for optimal customization. In the guide, we are going to walk through Google Analytics email reports and how to use them.
Why Use Google Analytics Email Reports?
There are a ton of good reasons why you should be using Google Analytics email reports but here are a few big ones:
- They automate marketing reports, saving time and money
- Add value to your client-based business
- Give you important data on a regular schedule
- Keep a close eye on your marketing efforts
- Multiple outputs like Excel, PDF, CSV, and more
So now that you know why you should be using this great analytics add-on, let’s get into all the great ways you can use email reports and what reports are most important to create.
How to Create Automated Email Reports in Google Analytics
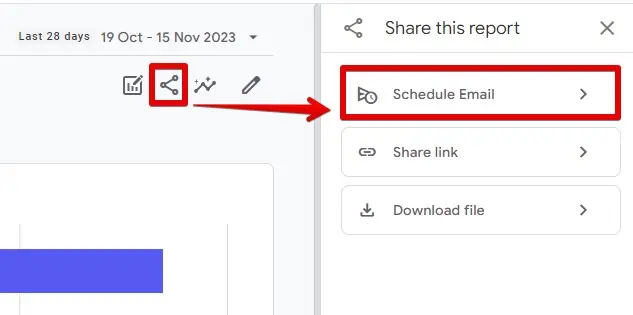
Creating automated email reports in Google Analytics is pretty straightforward. First, log in to your Google Analytics account and find any report. Once it’s open, move the cursor to the top right corner. To set up GA4 email reports, click the Share button — three dots connected by two lines. A new block will open on the right, where you must select Schedule email. When you click the button, a modal window will appear where you can edit the settings of the new email report.
Here are what each field means and some suggestions on the best use case:
- To: The recipients of the email report separated by commas
- Description: This is the subject line of the email that you will receive. Creating a custom subject will help differentiate reports in your emails.
- Attachments: Select which format you would like to receive the reports in. Allowed options are CSV and PDF.
- Frequency: How often do you want to receive your automated email report? Options include once, daily, weekly, monthly, and quarterly.
- Choose Date: The day when the first report will be sent to recipients. To create an email report, you should keep in mind that GA4 can take up to 72 hours to process data. Therefore, there is no point in rushing to launch newsletters.
- Active For: If you want to run the email report for a certain time period you can select anywhere between 1 and 12 months.
- Language: Google Analytics email report supports the same languages as the web service.
Once you have filled out all of the required fields, simply click ‘Send’ and your automated Analytics email reports will start sending based on the details you entered. You have now created your first automated email report in Analytics…But what if you want to change your report?
How to Change Google Analytics Email Reports
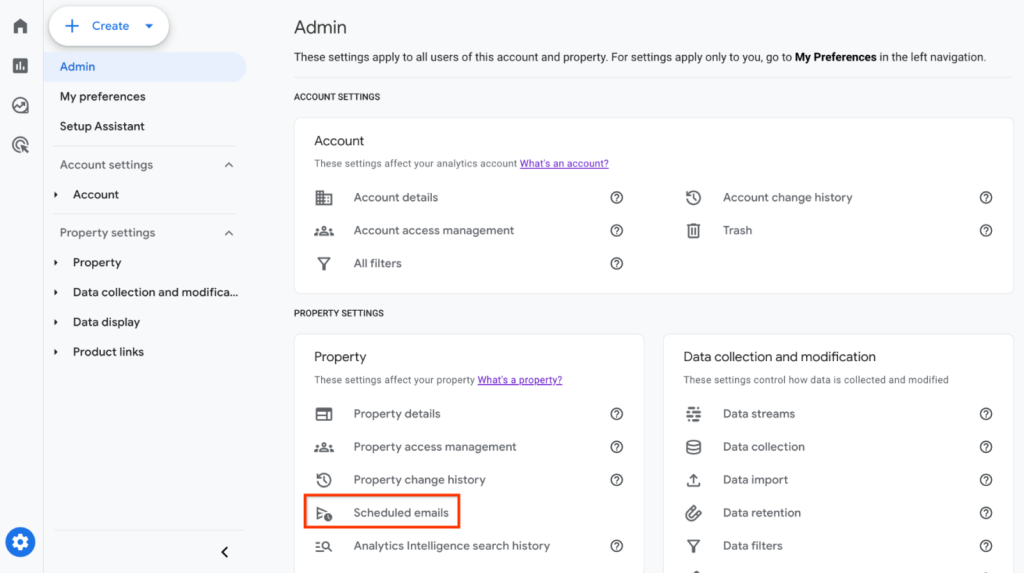
Let’s say you don’t like the current design of your weekly report and want to update the list of data in it. You can edit or delete your scheduled analytics email report by clicking the admin tab in the navigation bar. Select the Property section, then Property Details, and then the Scheduled Emails tab.
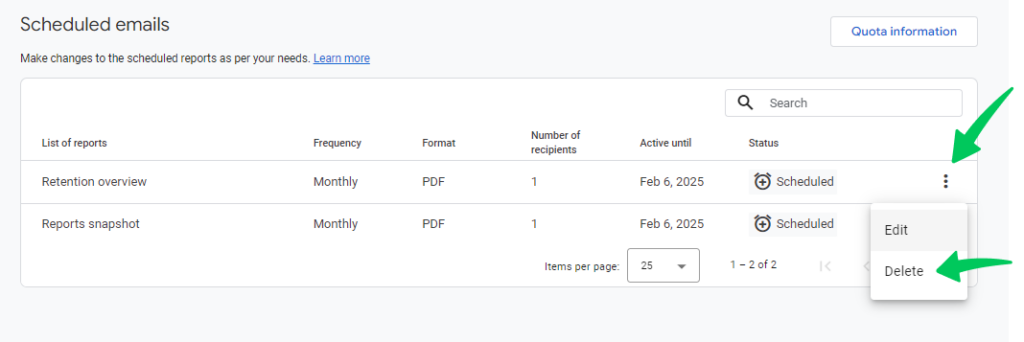
You should see a list of your current scheduled email reports. To edit or change your automated analytics email report, hover over the desired campaign, click the More button on the right (three vertical dots), and select Edit. This will open a form to change the settings of your custom report. Click Save when you are done, and your report will be changed.
How to Delete Google Analytics Email Reports
To delete a report, find it on the list as we described in the previous section. Click the More button with three dots and select Delete. Confirm the deletion and your report will now be removed and you will not receive them anymore.
Google Analytics Stats & Explanations
There are literally thousands of reports you can create in Google Analytics so we are going to show you some of the important stats to check for and what some of the best email reports are. Check out or Google Analytics Glossary for more terms.
Audience
- Users: New and returning visitors are called users.
- Pageviews: The number of views your pages got.
- Pages/ Session: Average page depth per user.
- Avg. Session Duration: Average amount of time (in minutes) users stay on your site.
- Bounce Rate: The percentage of single-page visits. The lower the bounce rate, the better.
Acquisition
- Source/Medium: Where your visitors are coming from?
- Social: Which social media sites are your visitors coming from?
- Campaigns: If you have any Adwords campaigns or URL parameters, you can track campaigns here.
Behavior
- All Pages: Your most popular pages.
- Exit Pages: Which pages are visitors leaving from?
- Site Search: What searches are being made on your website?
- Events: If you have custom events set up, then you can get a report of them here.
Conversions
- Goals: Any goal information like conversion rate and goal count can be viewed here.
- E-commerce: If you have e-commerce tracking set up, you can view revenue and other important reports here.
Use an Advanced Reporting Tool for Analytics and SEO Insights
No matter how simple and convenient GA4 email reports are, they still can’t cover the full range of SEO specialist needs. SE Ranking offers you a multifunctional SEO reporting tool that allows you to include the following data in your email campaigns:
- The effectiveness of keyword optimization;
- Comparison of key indicators with competitors;
- Website audit results.
Standard GA4 email reports are also included in these newsletters, which allows you to get a comprehensive assessment of your website’s performance.
Another advantage of SE Ranking is the ease of customizing reports. The service offers two useful features: templates and a visual designer. Once you open a draft report, you can edit it using the drag-and-drop method by simply dragging and dropping the necessary rows, columns, or data fields onto the screen. If you’ve studied how to get a report from Google Analytics, you know that this process can take several hours. With SE Ranking, setting up a campaign takes an average of 15-20 minutes.
It’s also worth noting that automated Google Analytics reports are hardly the best option in terms of reputation and branding management. SE Ranking solves this problem as well. It allows you to create white-label reports with your logo and send them from your company’s domain. This approach will be a significant advantage for your agency from the point of view of your clients.
Wrapping Up
So in conclusion, you can save a ton of time by creating scheduled reports that are sent out whenever you want. This will save you time from reporting to clients as well as having to compile the reports and send them.